 |
Poultry Nipple 2 Pack Replacement Parts For The BriteTap® Chicken Waterer or DIY Waterer Projects
- Two (2) replacement poultry nipples for the BriteTap Chcken Waterer or use in DIY chicken waterer projects.
- Comes with two BriteTap gaskets.
BriteTap Poultry Nipple Construction
- Made of sturdy Polyacetal thermoplastic and stainless steel.
- Poultry nipples disassemble for easy cleaning and removal of mineral build up.
How To Replace The Valves In Current Model (#2B) BriteTap Waterers
- Unscrew the old valves and remove the old gaskets.
- Place the BriteTap waterer upside down on a table.
- Place a new gasket into each hole in the bottom of the BriteTap waterer.
- Insert a poultry valve into the gasket and screw the valve into the waterer with your hand.
- Make the last few turns with a wrench. Don't over tighten or you'll damage the gasket.
- Note: Older BriteTap waterers with Model #1 and #2a valves will not need the gaskets included in this kit and should request the proper gaskets when ordering.
/
DIY Project Installations
- Drill a hole using a 23/64" (9mm) drill bit.
- If installing into PVC pipe, an optional step that improves the fit of the BriteTap poultry nipple is to tap the hole using a standard 1/8" - 27 threads per inch NPT (National Pipe Thread) tap. To do this, draill a 11/32" pilot hole and then tap to create the threads.
- Wrap the threads on the top of the poultry nipple with 2-3 turns of plumbers tape (Also called Teflon tape). This is sold in hardware and plumbing supply stores.
- Insert the poultry nipple into the hole and tighten using your hand or a wrench.
- Note: You will not use the gaskets that come with the poultry valves for DIY projects.
Poultry Nipple Usage
- Install poultry nipple on low-pressure tank fed systems. Do not attach directly to high-pressure main water supply lines or garden hoses.
- Use one poultry nipple for every 8 birds in your flock. Use a minimum of two nipples regardless of flock size to provide a back up if one poultry nipple should clog.
- You do not need nuts to fasten poultry nipples to your water supply tank.
- Poultry nipples can be use for baby chicke, chickens, ducks, guineas and other small fowl.
BriteTap Waterer Valves & Replacement Parts
BriteTap waterers currently sold on our web site use Model #2B valves to match with our current production model BriteTap waterer. If you purchase replacement valves, we will send you Model #2B valves unless you tell us to do otherwise.
Customers who need Model #1 or 2A valves for older model BriteTap wateers should specify the model number they need in the "Other Comments" box when placing an order.
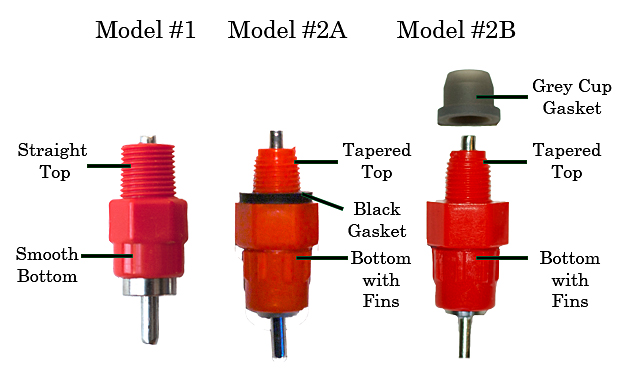
- Model #1 - used on BriteTap waterers sold from August 2011 through May 2012. This type of valve has a straight top and smooth bottom.
- Model #2A - used on BriteTap waterers sold after May 2012. This type of valve has a tapered top and fins on the bottom.
- Model #2B - used on BriteTap waterers sold after March 2013. This is the same valve as 2A but uses a grey cup-shaped gasket to accommodate the larger port hole on a modified version of the BriteTap waterer.
Installation on The BriteTap Waterer:
- Empty your water supply tank and remove the BriteTap waterer from it.
- Place the BriteTap waterer upside down on a table and remvoe the valve using a wrench to unscrew it from the body of the waterer.
- Remove the old cup-shaped gasket. Place a new one into the body of the waterer.
- Insert the vavle into the cup shaped gasket that is now placed in the waterer and then press down while screwing the valve into the body of waterer. Keep the vavle straight and turn and press the valve with steady pressure. At some point, it may become too difficult to turn by hand, so use a wrench for the last few turns.
- Re-attach the BriteTap waterer to your water supply tank and refill. Remember to tip the tank forward to remove any air trapped inside the BriteTap waterer.
Installation on a bucket or PVC Pipe:
- Drill a hole with a 7/16" (11 mm) drill bit.
- Place the gasket into the hole.
- Insert the vavle into the cup shaped gasket that is now placed in the waterer and then press down while screwing the valve into the body of waterer. Keep the vavle straight and turn and press the valve with steady pressure. At some point, it may become too difficult to turn by hand, so use a wrench for the last few turns.
Other Information:
- Install these valves on low-pressure, tank fed systems. Do not attach directly to high-pressure main line water supply lines or a garden hose.
- Use one valve for every 8 birds in your flock. Use a minimum of two valves regardless of the number of birds in your flock. The second vavle acts as a back-up.
- Note: You do not need nuts to install these valves. The nuts sold on our web site are designed to attach the BriteTap waterer to a water supply tank.
- These valves can be used to provide water to chickens, chicks, quail, pheasants, guinea hens and other small poultry breeds.
|
|
|


 Poultry Nipples


 Inferior quality